

Table of Contents
1. Introduction
Canary supports the import of tag data that is stored in CSV format. This technical note describes the principal points to follow for a successful import.
The Canary System consists out of three components, Data Collection, Data Storage and Data Analytics. The component that will be utilized in this document is the Data Collection component, where it will be shown how to use the CSV Collector. Canary Collectors can log data from multiple data sources, including OPC UA/DA, MQTT, and various other SCADA solutions.
To import tag data in CSV format into Canary, it is expected that you have the Canary Admin application installed and running on your computer.
There are 3 main steps that you need to follow to utilize the CSV import service:
- Install CSV Data Collector component
- Create config files
- Specify CSV files to import
These steps are described in greater detail in the following sections.
2. Install CSV Data Collector component
The CSV import service is available in the Canary Collectors options. The Canary CSV Collector component need to be installed to be able to access this service:
- Launch the Canary Admin installer. If a complete install has been done, you can skip this step. If not, you need to customize the current install to allow this feature.

2. Enable the CSV option under the “Data Collectors” tab. Also make sure you at least have the Historian, Canary Admin Service and Canary Admin Client options ticked as well.
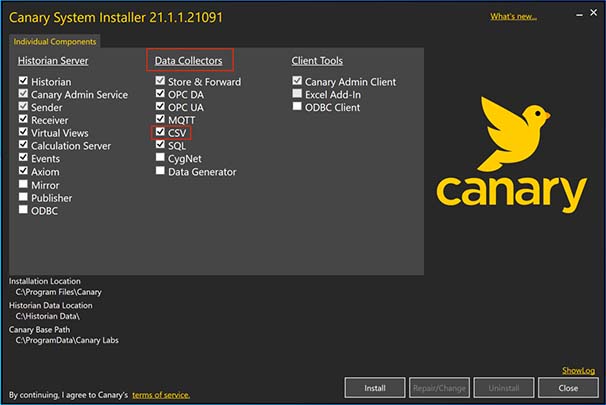
3. Click on the “Install” button. Once it has completed the installation, the next step is to create new config files.

3. Create config files
Two config files need to be created to tell the data collector how to import the data from the CSV files into a dataset located in a historian.
- Go to the Program Files folder in your C:\ drive and navigate to Canary > Collectors > CSV
2. In this folder, you need to create the config files. The first file is called SAF_ImportService.config
In this config file you need to specify the time in seconds the service will check a directory for a new CSV file and in which directory to search the import files. The service can be configured to monitor multiple directories if needed. This file needs to reside in the same folder as the SAF_ImportService.exe

Below is an example of how the config file should look. The <Interval> specifies the time in seconds the service will check for new files and the <InputDirectory> specifies the directory in which the service should monitor for new files. Notice how there are 2 input directories specified.

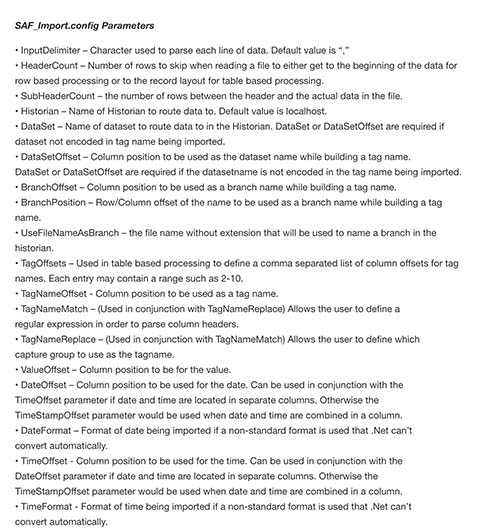
3. The second file is called SAF_Import.config
In this config file multiple parameters need to be specified that will be used to match the format of the CSV file to be imported into the historian. There are over 30 parameters to choose from. Here is an example of how the file should look.

Below is a list of all the parameter that can be specified. This list can also be found in C:\Program Files\Canary\Collectors\CSV\Canary CSV Collector Configuration.

4. Specify CSV files to import
The SAF_Import.config file should be copied and placed in the same directory in which the CSV files will be placed. Ensure that this folder is public, otherwise the collector won’t be able to process the files.
In the SAF_ImportService.config file, make sure the folder you chose as <InputDirectory> is where you paste the SAF_Import.config file along with the CSV files.
In this example, the folder is named “Import” and a <ProcessedDirectory> named “Processed” is created inside of the Input Directory folder. This is where the processed CSV files will be moved once the Collector has completed processing each of the files.

The Import folder is a public folder placed directly in the C: drive. Once you start adding the CSV files in this folder, according to the <Interval> period you set in the SAF_ImportService.config file, the files will be processed and moved to the Processed folder, if you chose to configure it. This is a good practice to implement. If this parameter is excluded, the processed CSV file will stay in the public folder where you placed it.
Switching over to the Canary Admin application, if you open the “CSV Collector” panel, the connections to the directory you set up will be visible.

When you open the “Historian” panel and navigate to the <DataSet> you specified, you will see the CSV data that is being imported according to your configurations.

5. Summary
To utilize the CSV import service in Canary, here is a summary of what you need to do:
- Install CSV Data Collector component
- Create config files
- Specify the CSV files to import
Element8 has data migration tools available for the conversion of exported data into CSV format. Feel free to contact us if you need help with your data migration.
For additional resourcing, please direct yourself to the Canary user manual