

Table of Contents
1. Introduction
Ignition can be configured to send notifications to Microsoft Teams. This technical note describes the principal points to follow for a successful configuration.
Microsoft Teams is a business communication platform designed and developed by Microsoft. This application offers workspace chat and videoconferencing, file storage and application integration. Microsoft Teams is free to download on microsoft.com and the sign-up procedure is free as well.
Ignition is an industrial application platform for collecting data, designing and deploying industrial applications throughout an enterprise. It empowers the creation of any kind of industrial application including SCADA, MES, IIoT, reporting, alarming and more. The trail is available for free download on inductiveautomation.com and the sign-up procedure is free as well.
To set up the connection between these two components, a webhook must be created in Teams. A webhook is a method of altering the behavior of a webpage or application (in this case) with custom callbacks. We will be utilizing this tool in Ignition to send messages and customized cards in a Teams channel chat.
There are 3 main steps that you need to follow to send notifications from your Ignition project to Telegram:
- Create and configure a webhook in Microsoft Teams
- Script the connection in an Ignition project
- Customize and send a card to Microsoft Teams
These steps are described in greater detail in the following sections.
2. Create and configure a webhook in Microsoft Teams
The first step is to create a new webhook in Teams. To do that we need to use a channel dedicated to this connection. You can also use an existing channel. Follow the steps below:
- Firstly, make sure you have downloaded and installed Microsoft Teams and that you have created a Team and a channel. This is what you should see in the Teams application once you have created all the above mentioned

2. Click on the desired channel and click on the ellipse in the same block. A popup will appear with multiple options for the chosen channel. Click on the “Connectors” option

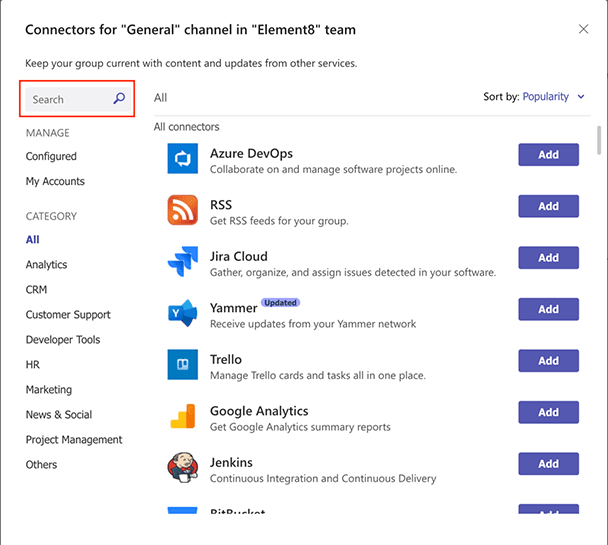
3. The following window will pop-up. This window will provide you with all the available connectors that you can add to your channel. Click on the search bar in the top left corner and search for “webhook”
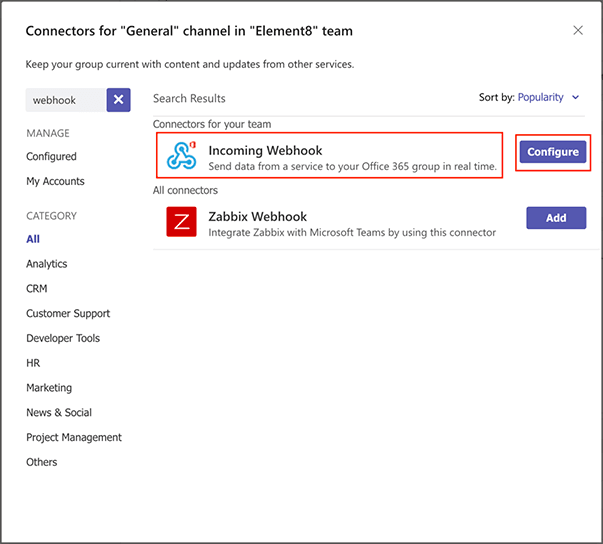
4. The webhook we will be using is called the “Incoming Webhook”. The button next to this option in the picture is labeled as “Configure” as we have a webhook already configured for the channel we are using as an example. But if this is the first time you are adding a webhook to a channel, the button will be labeled as “Add”. Click on this button.
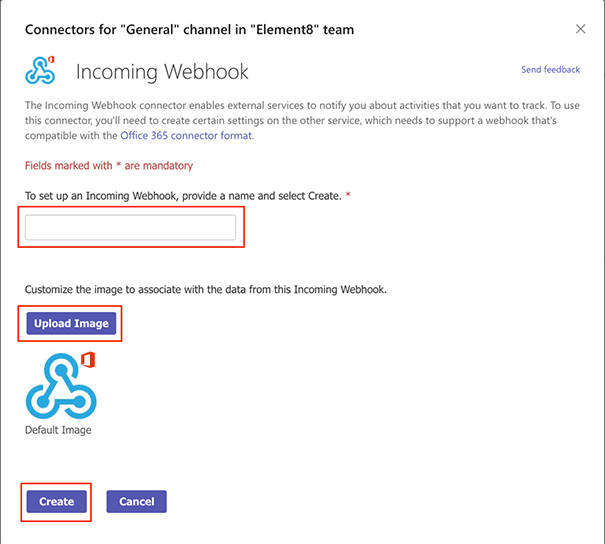
5. You will see the next pop-up window is where you can configure the webhook’s settings. You must provide the webhook with a name and it is optional to add an image. Once you are done, click on the “Create” button
6. The webhook has been created. Next, we need to copy and save the URI for the webhook to a save space. This URI will be used to set up the connection in Ignition.
Again, open the connectors window for the channel, and navigate to the “Configured” option on the left-side navigation panel under “Manage”.

Click on the “1 Configured” drop down option as indicated in the picture above. You will see the webhook that you created. Click on the “Manage” button next to it. This is where you will find the webhook URI.
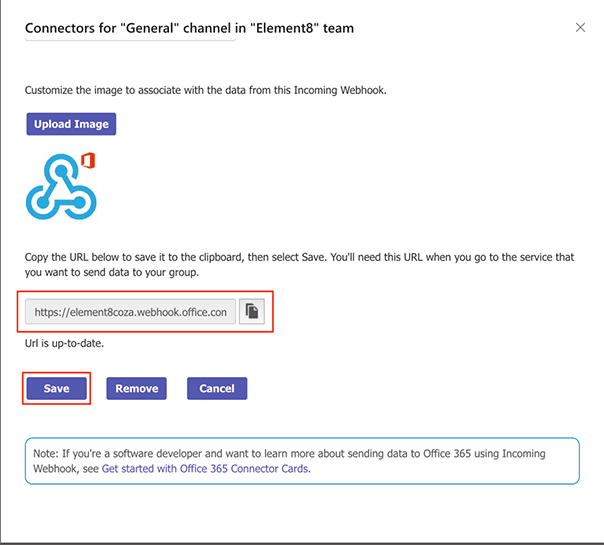
7. Scroll down on the new window, up until you can see the URI provided for the webhook. Copy this URI by clicking on the icon button next to it. It will display that it has been copied to your clipboard, and it is advised that you save it to a notepad. Click on the “Save” button when done
The following notification will also be present in the channel where you have added the webhook. This is to confirm that the webhook has successfully been added to the channel:

3. Script the connection in an Ignition project
Next up is to configure the connection in Ignition to send notifications through to the Microsoft Teams channel. It is expected that you already have Ignition installed and a project created for this next section.
To demonstrate how Ignition can send notifications to Teams, a basic Ignition project with only a button component will be utilized.
- Open your project in the Ignition Designer. The idea is to write the connection script on a user interactable component. In this example, we have used a normal button. Right-click on the button and choose the “Scripting” option

2. In the left-side panel, choose the “actionPerformed” option as the Event Handler. An event is fired when the ‘action’ of the component occurs, and it depends on the type of component used. In this case, when the button is clicked via a mouse click or key press

3. In the Script Editor is where the Python code will be written and executed. This is the action event in which to code the connection. Click on the “Script Editor” tab and enter the following Python code:
message = “Hello World!”
uri = “YOUR URI HERE”
system.net.httpPost(uri, “Application/Json”, message, 10000, 60000)
4. Your code should look something like this:

The uri variable contains the connection URI to the Microsoft Teams webhook. This URI will be used in the final system API call. Enter your URI token in the double quotation marks next to the uri variable
For the message variable, enter in double quotations your own message that you would like to send to Microsoft Teams.
The POST request will be sent through the system.net.httpPost Python package. It needs the uri as the first parameter, the type of application data as the second parameter, the message as the third parameter, the connect timeout as fourth parameter, and the read timeout as fifth parameter. Parameter descriptions to follow:

5. To save the connection script, click on the “Apply” and the “OK” button. When you put the project into preview mode, and click on the button, soon you will receive a notification in the Microsoft Teams channel that looks something like this:

You can customize the message to your preference that is sent to the channel. One example is to add user input in the form of JSON data in your message variable.

4. Customise and send a card to Microsoft Teams
There is another great way to send a notification to a channel via a card as a connector message. In this example we will demonstrate how to create a task by using JSON data to create cards containing rich inputs, such as text entry, multiselect or selecting a date and time. The code that generates the card and posts it to the webhook URL can run on any hosted service, in this case the Ignition project. These cards are defined as part of actionable messages and are also supported in cards, used in Teams bots and messaging extensions.
As an example, we have created a simple window in an Ignition project to showcase how you would be able to take user input and turn it into JSON data to use in a card.
There is a text field for a name and surname, the project name and to who it can be assigned to. There is also a dropdown field which has been customized with different task status options as well as a calendar date and time picker.
Again, we have utilized a button component as the action component. Right-click on the button and choose “Scripting”, or you can double click on the component to open the scripting editor. The base for the connection code stays the same, it is only the message body that will be edited to create a card and use dynamic user input.
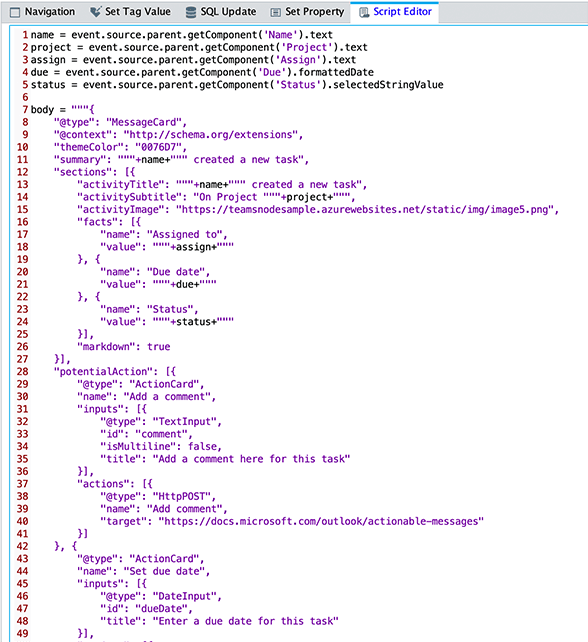
This is the code for a card:
name = event.source.parent.getComponent(‘Name’).text
project = event.source.parent.getComponent(‘Project’).text
assign = event.source.parent.getComponent(‘Assign’).text
due = event.source.parent.getComponent(‘Due’).formattedDate
status = event.source.parent.getComponent(‘Status’).selectedStringValue
body = “””{
“@type”: “MessageCard”,
“@context”: “http://schema.org/extensions”,
“themeColor”: “0076D7”,
“summary”: “””+name+””” created a new task”,
“sections”: [{
“activityTitle”: “””+name+””” created a new task”,
“activitySubtitle”: “On Project “””+project+”””,
“activityImage”: “https://teamsnodesample.azurewebsites.net/static/img/image5.png”,
“facts”: [{
“name”: “Assigned to”,
“value”: “””+assign+”””
}, {
“name”: “Due date”,
“value”: “””+due+”””
}, {
“name”: “Status”,
“value”: “””+status+”””
}],
“markdown”: true
}],
“potentialAction”: [{
“@type”: “ActionCard”,
“name”: “Add a comment”,
“inputs”: [{
“@type”: “TextInput”,
“id”: “comment”,
“isMultiline”: false,
“title”: “Add a comment here for this task”
}],
“actions”: [{
“@type”: “HttpPOST”,
“name”: “Add comment”,
“target”: “https://docs.microsoft.com/outlook/actionable-messages”
}]
}, {
“@type”: “ActionCard”,
“name”: “Set due date”,
“inputs”: [{
“@type”: “DateInput”,
“id”: “dueDate”,
“title”: “Enter a due date for this task”
}],
“actions”: [{
“@type”: “HttpPOST”,
“name”: “Save”,
“target”: “https://docs.microsoft.com/outlook/actionable-messages”
}]
}, {
“@type”: “OpenUri”,
“name”: “Learn More”,
“targets”: [{
“os”: “default”,
“uri”: “https://docs.microsoft.com/outlook/actionable-messages”
}]
}, {
“@type”: “ActionCard”,
“name”: “Change status”,
“inputs”: [{
“@type”: “MultichoiceInput”,
“id”: “list”,
“title”: “Select a status”,
“isMultiSelect”: “false”,
“choices”: [{
“display”: “In Progress”,
“value”: “1”
}, {
“display”: “Active”,
“value”: “2”
}, {
“display”: “Closed”,
“value”: “3”
}]
}],
“actions”: [{
“@type”: “HttpPOST”,
“name”: “Save”,
“target”: “https://docs.microsoft.com/outlook/actionable-messages”
}]
}]
}”””
uri = “YOUR URI HERE”
system.net.httpPost(uri, “Application/Json”, body, 10000, 60000)
Your code will look something like this:
- The first thing to notice in the code is the name, project, assign, due and status variables created. These variables are referencing different properties of the components on the window, to extract the data provided by the user.
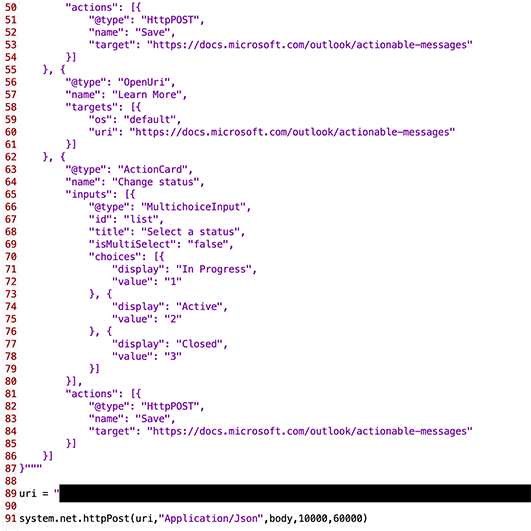
- Next, is the body variable. This code is written by Microsoft to create a card. There are multiple other information displays available, so don’t forget to check that out on Microsoft’s online documentation.
- Note the variables displayed in green. This is to add the variable as string data to the JSON string data.
- Then you need to add your webhook uri to the uri variable in double quotation marks.
- And lastly, sending the uri, type of data, body message, connect timeout and read timeout as part of the post call function.
- To save the connection script, click on the “Apply” and the “OK” button. When you put the project into preview mode, add user input and click on the button, soon you will receive a notification in the Microsoft Teams channel that looks something like this:
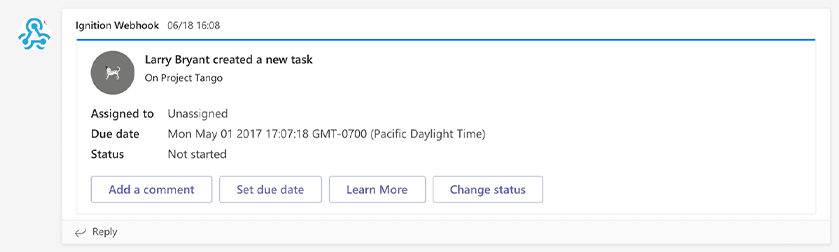
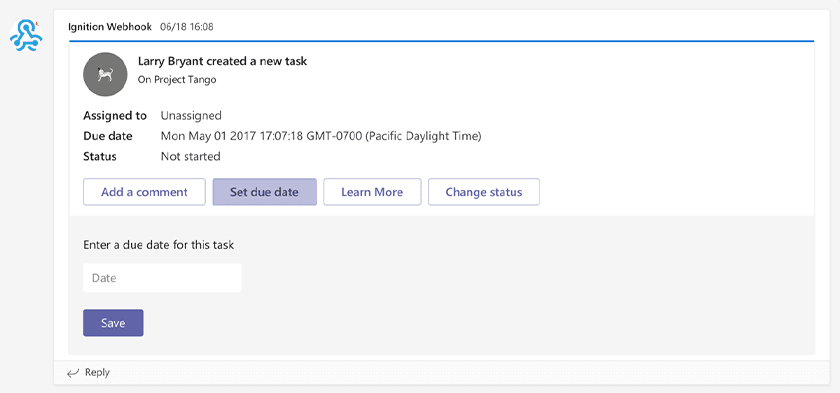
7. The card looks professional and is great as it is interactable with in Microsoft Teams. You can add a comment:

8. You can set or change the due date of the project:
9. And you can change the status of the project:

This is a great tool to play around with and build your own customizable cards, messages and webhooks. Read up on webhooks and connectors on the Microsoft webpage at docs.microsoft.com
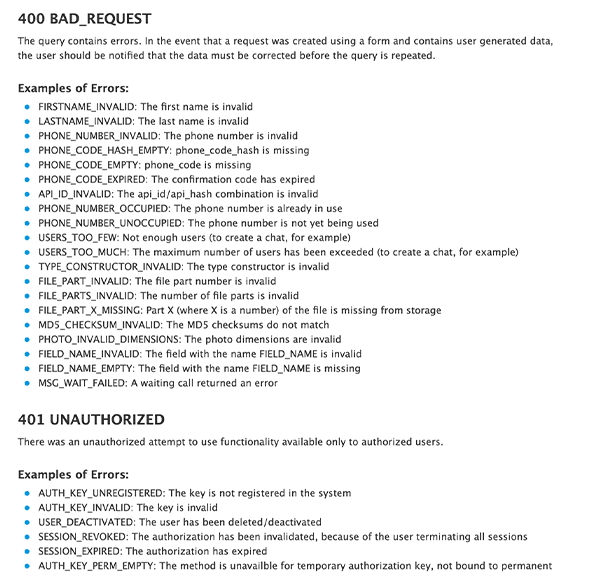
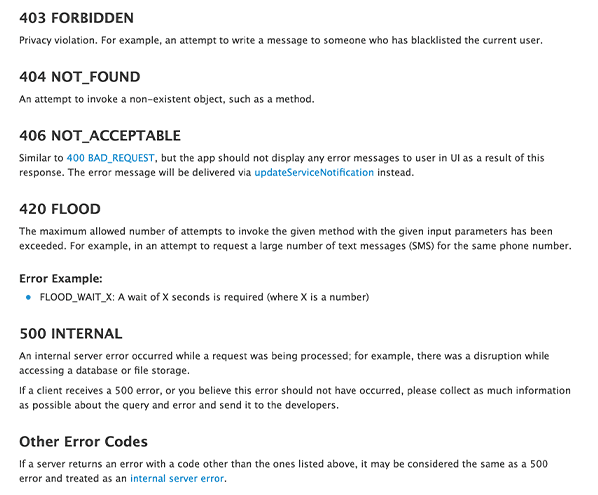
5. Error Handling
If you do run into some server request errors, here is a list of the potential problems that could be inside of your script:
6. Summary
To send notifications from your Ignition project to Microsoft Teams, here is a summary of what you need to do:
- Create and configure a webhook in Microsoft Teams
- Script the connection in an Ignition project
- Customize and send a card to Microsoft Teams
For additional resourcing, please direct yourself to the Ignition user manual by clicking on the link below: inductiveautomation.com